
Entering a Job Description is the second stage of creating a job post.

On the Job Description screen, text can be entered and formatted for the following options:
- Package Description
- Job Introduction (Internal)
- Job Introduction (External)
- Main Responsibilities
- The Ideal Candidate
- Internal job notes
Text can be entered manually or pasted directly from Word, or as plain text. In this example, the text has been manually entered in the Package Description text box and formatted using the functions provided.
Important Note
If you copy text from a word document and paste it directly into the description boxes you risk publishing a role that shows unusual characters. To avoid this, you will need to ensure that you select the ‘Paste from Word’ icon first and then paste the text into the pop up that appears. Unfortunately, this isn’t something that Tribepad can control so to work around it, we offer the ‘Paste from Word’ option.

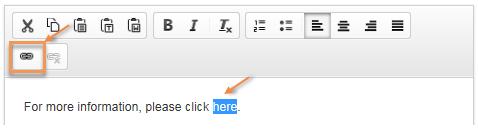
Adding Links
If you want to add links to your descriptions highlight the text and click the Link icon:
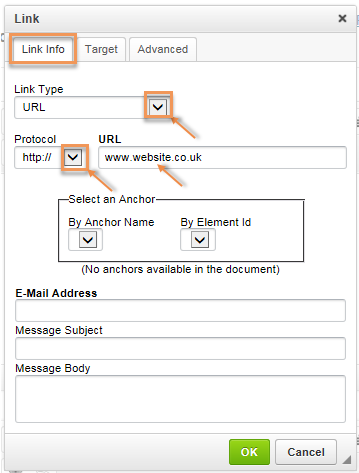
This will display a pop-up with three tabs: Link Info, Target and Advanced. The default tab is Link Info, from here you can specify the Link Type (URL, Link to anchor in the text or Email).
In this example, the Link Type is set to URL and the website address has been entered as https://www.website.co.uk:
If you want the link to open in a new window, click on the Target tab and set the Target as New Window (_blank) from the list of dropdown options:

Alternatively, you can set the Target as <popup window>. This option enables the attributes of the window to be configured, for example:

Note: if you do not set the Target, the link will open in the current browser window.
Select any options you require from the Advanced tab (optional) and click the OK button to save the configuration or click Cancel to cancel.

Attach documents
To attach documents to the job post, click the Upload files button:

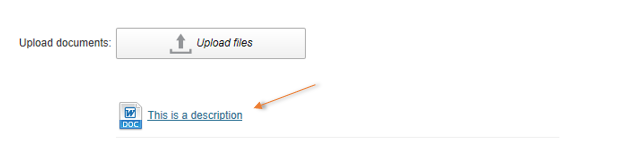
Select the file you wish to attach and click Open. Add a description and click the Finish uploading button:

The attached file and its description will then be displayed immediately below the Upload files button:
Tag Cloud: comma separated
Use this area to add relevant tags for the job being created. Use commas to separate the tags:

Buttons
The following buttons are available at the bottom of the Job Description screen:
![]()
Back – when clicked you will be returned to the Job Details screen
Cancel – when clicked the details entered so far will not be saved and you will be returned to the Jobs List
External Preview – when clicked a preview of how the job will appear to external candidates will be displayed. Click Close to return to close the preview
Internal Preview – when clicked a preview of how the job will appear to internal candidates will be displayed. Click Close to return to close the preview
Finish – when clicked the details entered so far will be saved and you will be returned to the Jobs List
Next – when clicked the details entered so far will be saved and you will progress to the next stage of job creation – Authorise job post