Anonymised/Anonymous Applications


Below is a summary of the main areas that have been added to set up and managed the Anonymised Applications process and the views the users see.


Creating a job

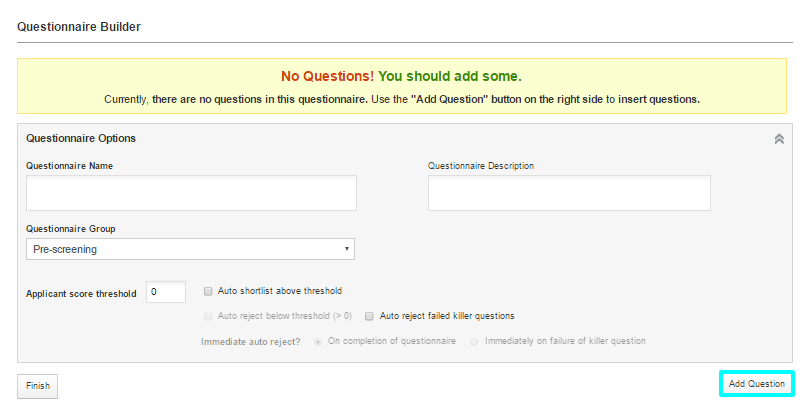
When you now create a new job on the ATS you will see the following box as part of the process.

BBC Careers Hub
When both of these options are selected the full ATS will be anonymised for candidate applications.


  • If only the “Enable anonymous CV sending” option is selected then the candidate data is NOT anonymised and only the CV generated by Tribepad is when sent from the platform.
  • When “Enable anonymous candidates throughout the ATS” is selected then the full ATS is anonymised.


When the Enable anonymous CV Sending is selected then job is automatically set up to not allow the candidate to upload their own CV against this application.  This is done by auto blocking the option in the User journey section.


Viewing a job

When the job has been selected to be anonymised then when viewed by the ATS user they will see the following candidate view, where the name is replaced by a code.


Screen Shot 2016-03-24 at 09.10.08


If you then click through on the candidates code you will see the anonymised candidate profile.

Screen Shot 2016-03-24 at 09.11.30


The Download CV option will only download the anonymised Tribepad generated version.


Screen Shot 2016-03-24 at 09.12.29


Candidate Mini Profile.

The Candidate mini profile which is available from the jobs list page has also been anonymised.
Screen Shot 2016-03-24 at 09.22.04


Emails

When the candidate applies for a job which is part of the anonymised process, they will be told their candidate reference with the top of the email, which they should use if they wish to contact the recruitment team.


All emails sent to the candidate who have applied to an anonymised jobs will be titled: Dear Candidate and will have the following sentence within the top of the email:


Your reference for this application is: “candidate 1234”.  Please use this when contacting the internal recruitment team for support.


CV Search

CV Search has been updated to allow a user to search against the candidate reference, and this will return the anonymised version of the candidate.
Screen Shot 2016-03-24 at 09.17.28

You can also search within CV search on a job reference and if this job reference is part of the anonymised process then all candidates returned as anonymised.

Screen Shot 2016-03-24 at 09.18.30
Job Log

The job log has been updated to only shown anonymised candidate data, so movement of candidates can still be seen and tracked.

Screen Shot 2016-03-24 at 09.20.31

Back To Top

Creating an Offers Process Questionnaire

Creating an Offers Process Questionnaire

An Offers Process Questionnaire is a Questionnaire that you would fill in prior to making a candidate a job offer. This would be filled out by the Hiring Manager for the role. An offers questionnaire would be used to record details about the job offer, either for auditing purposes, or it may need approval from an HR/Finance department prior to the offer being made.

When creating your Offers questionnaire, you should first determine what information is required.  Your HR management may need specific pieces of information prior to authorising a role.

In this article, we are going to create an Offers Questionnaire with the following questions:

  1. The type of hire (are they an internal or external job seeker?)
  2. The start date of the role.
  3. The salary that will be offered.
  4. Any additional bonuses or benefits that will be offered.

To create your Offers Questionnaire, go to the Jobs menu, select Questionnaires and click on Standard Questionnaire. Enter a sensible name and description under Questionnaire Name and Questionnaire Description.  Select Offers from Questionnaire Group.

offers1

Once you have done this, you are ready to add your questions, by clicking on the Add Question button. Once you have selected all of your question(s), select Insert.

offers2

Once done, simply select Finish from the bottom left hand corner.

Back To Top

Building an Interview Feedback Process Questionnaire

Building an Interview Feedback Process Questionnaire

Interview Feedback process questionnaires are a useful way of collating feedback from an interviewer to determine how to process the candidate from this point onwards – whether you offer the candiidate the job, or decide to invite them to the next stage of the interview process, or decide to reject their application.

When creating the questions for the type of questionnaire, you should ensure that they enable the recruiter to be able an informed decision on whether or not to process the candidate further. For this article, I am going to create an interview feedback questionnaire with the following questions.

  1. What is the job title?
  2. What is the job reference?
  3. The name of the interviewer.
  4. What is the relevance of the candidates experience within the industry? (Scored 1-5)
  5. What is the relevance of the candidates qualifications? (Scored 1-5)
  6. How well do you think the candidate would work within a team? (Scored 1-5)
  7. Any other relevant comments.

To create the questionnaire, firstly load up the questionnaire builder by clicking on the Jobs menu and selecting Questionnaires. Then click on the Standard Questionnaire button.

Firstly give the questionnaire a sensible name and description, and select Interview Feedback from the Questionnaire Group.  Then click on Add Question.

interviewfeedback1


From here you will now be able to select your questions.  Once you have finished selecting them, click on Insert.

interviewfeedback2

Once you are happy with the layout of the questionnaire, you can click on the Finish button in the bottom left hand corner.

Back To Top

Creating a CV Feedback Process Questionnaire

Creating a CV Feedback Process Questionnaire

A CV Feedback process questionnaire is a useful tool for you to use when reviewing shortlisted candidates.  It can allow the recruiter to get a better understanding as to whether or not they should invite a candidate to interview, where the CVs have been reviewed by a different member of the team.

In this article, we are going to ask three questions in our questionnaire:

  1. The name of the person reviewing the CV.
  2. Relevance of previous experience.
  3. Whether or not the reviewer feels that we should invite the candidate to interview.

In order to create our CV Feedback questionnaire, we will load up the Questionnaire Builder by going to the Jobs menu and selecting Questionnaires.  We will then click on Standard Questionnaire.

Once in the Questionnaire Builder, enter a name and description for your questionnaire and select CV Feedback from the Questionnaire Group menu.

cvfeedback1


Next, add your questions by clicking on the Add Question button on the bottom right hand corner of the page. Search for the question that you want to ask from the list of available questions and then click on Insert.

cvfeedback2

Once done, click on Finish in the bottom left hand corner of the page.

Back To Top

Branching Questionnaires

Setting up a Branching Questionnaire

A branching questionnaire is a special type of questionnaire that allows you to ask candidates different questions based on the response they provided to the previous question.

Before you create your branching questionnaire you need to carefully consider the questions that you would like to ask (in order to gain the information you require) and also the journey that the user will be taken on which is dependent upon the questions asked and the responses selected/given.

All questions that are to be used in a branching questionnaire will be made ‘required’ and the question or answer will need to be linked.

Once you have created all of your questions, you can create your questionnaire

To create your branching questionnaire, go to the Questionnaires option in the Jobs menu and select Branching Questionnaire.

2

When you have clicked on Branching Questionnaire, you will be taken into the Questionnaire Builder.   The first step is to give your questionnaire a name, add a description if that helps identify what that questionnaire is to be used for.

Select the questionnaire type and then you can choose whether you want to add a score threshold, generally, this would have already been determined whilst creating your questions.

2


Then you will need to choose your first question –

2

Next, we can specify which answer will link to which question is asked next.  To do this, click Link to Question and select the relevant question.

The questionnaire builder will automatically add any linked questions to the questionnaire –

2


From here, you may continue with this process until you’ve answered (for example) every country/region you require.


Back To Top

Building a Campaign Planning Process Questionnaire

Building a Campaign Planning Process Questionnaire

In this article we will have a look at how to build a Campaign Planning process questionnaire.

A Campaign Planning process questionnaire is completed by the Hiring Manager for the role. It allows the recruitment team to be given details on requirements for a role that they are managing for the Hiring Manager, such as key skills required in applicants, or the date that the role will start from.

To create a Campaign planning questionnaire, firstly select “Questionnaires” from the “Jobs” menu. Then, under Questionnaire Name give your questionnaire a sensible name. Under Questionnaire Description briefly describe your questionnaire so that others will understand its purpose. Then select “Campaign Planning” from Questionnaire Group.

campaign_1

Once you have enter in all of this information, you will need to decide what sort of questions you will need to enter into your Campaign Planning questionnaire. Remember, these questions should be ones that are vital for the recruitment team to know the answers to, that are not covered in the job description itself. Commonly, these will include questions asking for the start date of the role, or asking for specific qualities that should be sought from candidates applying for the role.

In order to add a question to your questionnaire, simply click on “Add Question” in the bottom right hand corner and then chose your question from your pre-created bank of questions. Once you have selected the question you would like to use, click on “Insert”.

campaign_2

If you want to split your questionnaire across multiple pages, you can add a page break by clicking on the “Page Break” button. Any questions below this line will appear on a new page.

Once you have all of your questions in place, all that you have left to do is to click on “Finish”. You can then use your Campaign Planner questionnaire when posting new jobs.

Back To Top

Creating a Pre-Screening Questionnaire

Creating a pre-screening questionnaire

A pre-screening questionnaire is a useful and powerful tool to allow you to screen your candidates more efficiently. They can assist your teams in sifting out candidates that you would not want to consider shortlisting, for example someone who doesn’t have the right to work in the country where the job is based, or hold a driving license if you are recruiting for a driving role.

It will ask the applicant a series of questions at the same point of applying for the role. You are able to customise and choose the questions that you would like to ask the applicant and these can be changed for each role that you post.

Once completed, you will be able to easily see how the candidate scored, whether they passed/failed key questions and the ability to filter candidates based on the answers that they chose when completing the questionnaire.


Apply multiple pre-screening questionnaires to your job advert!

You can now apply multiple pre-screening questionnaires to a role, which enables you to add a standard company one, ie which covers ‘right to work’, diversity and more, then more specific role-related questions around the skillset needed for the position.  Both questionnaires can be a mix of killer, competency-based, radio button,/drop-down list and open text boxes.  How you use them is down to you.


Let’s take a look at the settings that you can use within the aptly named Questionnaire Builder.

The top two sections are fairly self-explanatory, Questionnaire Name allows you to name your questionnaire and Questionnaire Description allows you to enter a short description of the questionnaire that you are building. Questionnaire Group is also fairly clear, you need to choose the right type of questionnaire from the group. In this case, selecting “Pre-screening”.

prescreen1

One of the more powerful features of the pre-screening questionnaire comes in the other settings available to you.

Applicant score threshold gives you the ability to set a score threshold based on the scoring that you have implemented within your pre-screening questionnaire. This, coupled with selecting either the Auto reject below threshold and/or Auto shortlist above threshold means that you can automatically reject any candidates who score below your threshold score, and/or shortlist candidates who score at least the threshold score as soon as they have completed their pre-screening questionnaire, thus saving your recruiters considerable periods of time sifting through all applications.

Auto reject failed killer questions also means that you can automatically rejected any candidate who answers a designated questions (or questions) incorrectly, regardless of their overall questionnaire score. A common example of this is from asking the applicants the question of whether or not they are legally entitled to work in the country where the role is based.

In order to build the questions in which you would like to add into the questionnaire, you just need to click on “Add Question” found in the bottom right hand corner of the screen as pictured.

prescreen2

From here, you will then be able to select one of your pre-built questions to enter into your questionnaire, as shown below. You can do this as many times as you require until you have the desired number of questions. Should you feel that you have too many questions within one page, you can enter a page break, to move all questions below the line onto a new page by using the “Insert Page Break” button.

prescreen3

Once you are satisfied that you have created all of your questions, you can simply click on the “Finish” button in the bottom left hand corner. Don’t worry though, you can always come back to edit your questionnaire by selecting the edit icon in the questionnaire list page.

prescreen4

Back To Top

Creating a Shortlist Process Questionnaire

Creating a Shortlist Process Questionnaire

In this article we will have a look at how to build a Shortlist process questionnaire.

A Shortlist Process Questionnaire is completed by the team responsible for submitting candidates to the shortlisting stage. You should ask a series of questions which will assist the recruiter responsible for booking the candidate into interview, as well as some information to support the Hiring Manager for the purpose of the interview itself.

To create a Campaign planning questionnaire, firstly select “Questionnaires” from the “Jobs” menu.  Then, under Questionnaire Name give your questionnaire a sensible name. Under Questionnaire Description briefly describe your questionnaire so that others will understand its purpose. Then select “Shortlist” from Questionnaire Group.

shortlist_1

Next, you will need to decide what sort of questions you would like to be present in your questionnaire.  Remember, you are asking questions that will assist both the recruiter booking the interviews, and also information that will be beneficial to the person conducting the interview.

So, you may want to ask questions around interview availability, key skills, notice period and the reason they are looking to leave their current role.

In order to add a question to your questionnaire, simply click on “Add Question” in the bottom right hand corner and then chose your question from your pre-created bank of questions. Once you have selected the question you would like to use, click on “Insert”.

shortlist2

If you want to split your questionnaire across multiple pages, you can add a page break by clicking on the “Page Break” button.  Any questions below this line will appear on a new page.

Once you have all of your questions in place, all that you have left to do is to click on “Finish”.  You can then use your Shortlist questionnaire when posting new jobs.


Back To Top

Advanced filtering of candidates within the ATS (including progress dots)

Advanced Filtering of Candidates within the ATS

It’s often a very time consuming task to prepare your shortlist when you have a high volume role.  That’s why we created Advanced Filtering to help you save so much time, so for example, you can quickly filter against all candidates who have completed their pre-screening questionnaire and have also passed all the killer questions in that questionnaire.

To use advanced filtering, select the icon displayed below from within your candidate processing page.

advanced1

Now you will be presented with your filtering option.


adv filters

  • Completed and passed killer questions: This will filter all candidates who have completed their pre-screening questionnaire and have passed all (if any) killer questions contained within that questionnaire. You may elect to shortlist all of these candidates if the closing date for the role has passed.
  • Incomplete applications: This will show you all applicants who have not completed their pre-screening questionnaire.  If the closing date of the job has passed, you may want to reject all these candidates.
  • Failed killer question: This will show you all candidates who have failed the killer questions in their pre-screening questionnaire.  You may elect to reject all these candidates.
  • Score >: This will allow you to see any candidates who have scored above a certain score in their pre-screening questionnaire.  Another useful shortlisting tool.
  • Question: / Answer(s): This allows you to check for specific answers to one or more questions. As an example, in your pre-screening questionnaire, you may ask your candidates how much experience in the relevant field they have, then filtering for any candidates with 10+ years experience.
  • Skills: Allows you to search for any skills you may find desirable that the candidate has listed in the skills area of their profiles.
  • Location: Allows you to search for candidates within a specified distance of a certain location.  This could be useful if you don’t want your job seekers to commute more than a certain distance.
  • Interview Stage: Allows you to search for any candidates t a certain stage of your interview process for this role.
  • Right-to-Work status: Here you can filter out those who answer your RTW question (where this integration exists) as passed, failed, pending review, document not provided
  • Tribepad Video Interview Status: Filter Complete/Incomplete interviews plus those with/without downvotes
  • Candidate Type: External, Internal, Passive Candidate, Agency Candidate


When you’ve determined which of these filters you would like to use, simply click on the Apply Filters button.


Also – from either your Jobs List or the Applications Dashboard, you now have the ability to view candidates in process for your vacancy and instantly see how far they are with their application, from the coloured progress dots shown in this image –

1


Here, on the image below, you can see what each coloured dot means –

Green = completed

Orange = started but not completed

Grey = not yet started


1


Back To Top

Job Create Process (Interviews & Publishing Roles)


> Help & Support

Back To Top